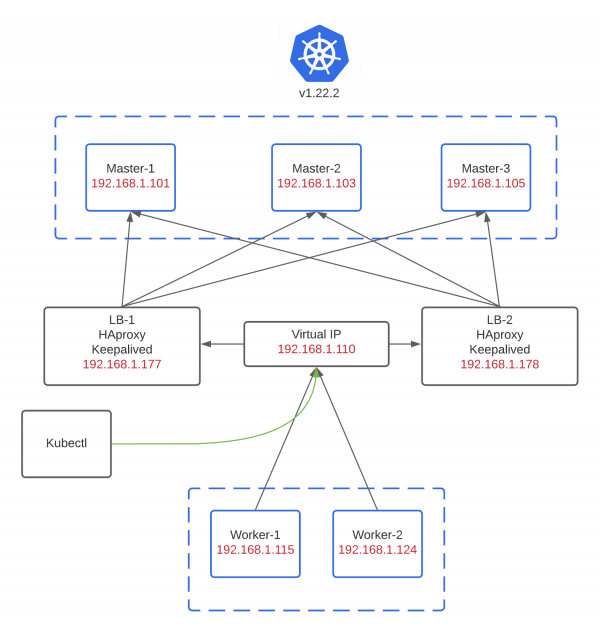
Kubernetes provides us a convenient way to make our application easier to maintain and more scalable. Since kubernetes is only an abstraction that runs on a set of machines and consists of many components, we have some work to do to keep our kubernetes cluster well-established and healthy, especially to make that cluster highly available. In this case, I use two HAproxy instances to balance the load over the network or we usually say that as load balancing. Not only that, I also use Keepalived which will make it redundant between the two HAproxy instances. The diagram below depicts how HAproxy and Keepalived play their role :

It simply tells us that there is an virtual IP that will be a central point where client / kubectl and worker should connect to in order to reach master nodes. This virtual IP will travel between HAproxy 1 and HAproxy 2 and it’s provided by Keepalived. So whenever a nasty network failure happens, Keepalived will be responsible to look for which HAproxy instance is available and choose it as master or designated instance to continue the traffic over the networks. It’s not only a high available kubernetes cluster itself but also a high available load balancer.
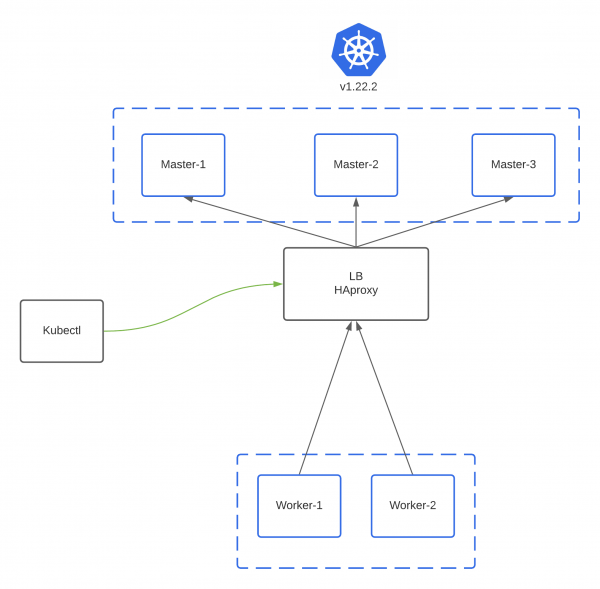
For comparison, see the picture below :

There’s only one HAproxy and no Keepalived being used. It might result an obvious answer if there’s a failure in HAproxy, what is it ? It’s guessable question I think hahaha, but yeah the cluster would be inaccessible and it’s usually called as single point of failure. Should we give it a shot on production area ? Of course that should never have been done.
Let’s have a practice! Anyway, before going through this lab, I recommend you to see this post which is about how to automate kubernetes cluster installation using kubespray. Hopefully it will make you understand a bit how kubespray works and how to make a setup for it. Because in this scenario, we will learn how to make a highly available kubernetes cluster with the help of kubespray to get all the installation stuff done and I will not mention them much in this time.
- Install HAproxy and Keepalived on both of HAproxy instances
yum install -y keepalived haproxyNote : Because I use centos 7 for this lab, if you want to follow along, don’t forget to give the proper rules to firewalld and selinux. But for the simplicity of this lab, I consider to stop firewalld and set selinux to permissive.
- Configure HAproxy & Keepalived ( LB-1 )
HAproxy :
frontend kubernetes-frontend
  bind *:6443
  mode tcp
  option tcplog
  default_backend kubernetes-backend

backend kubernetes-backend
  option httpchk GET /healthz
  http-check expect status 200
  mode tcp
  option ssl-hello-chk
  balance roundrobin
    server master-1 192.168.1.101:6443 check fall 3 rise 2
    server master-2 192.168.1.103:6443 check fall 3 rise 2
    server master-3 192.168.1.115:6443 check fall 3 rise 2
Keepalived :
vrrp_script check_apiserver {
  script "/etc/keepalived/check_apiserver.sh"
  interval 3
  timeout 10
  fall 5
  rise 2
  weight -2
}

vrrp_instance VI_1 {
    state BACKUP
    interface eth0
    virtual_router_id 1
    priority 100
    advert_int 5
    authentication {
        auth_type PASS
        auth_pass mysecret
    }
    virtual_ipaddress {
        192.168.1.110
    }
    track_script {
        check_apiserver
    }
}- Configure HAproxy & Keepalived ( LB-2 )
HAproxy :
frontend kubernetes-frontend
  bind *:6443
  mode tcp
  option tcplog
  default_backend kubernetes-backend

backend kubernetes-backend
  option httpchk GET /healthz
  http-check expect status 200
  mode tcp
  option ssl-hello-chk
  balance roundrobin
    server master-1 192.168.1.101:6443 check fall 3 rise 2
    server master-2 192.168.1.103:6443 check fall 3 rise 2
    server master-3 192.168.1.115:6443 check fall 3 rise 2
Keepalived :
vrrp_script check_apiserver {
  script "/etc/keepalived/check_apiserver.sh"
  interval 3
  timeout 10
  fall 5
  rise 2
  weight -2
}

vrrp_instance VI_1 {
    state BACKUP
    interface eth0
    virtual_router_id 1
    priority 100
    advert_int 5
    authentication {
        auth_type PASS
        auth_pass mysecret
    }
    virtual_ipaddress {
        192.168.1.110
    }
    track_script {
        check_apiserver
    }
}
A bit explanation of those configurations :
- HAproxy will listen and receive any request on port 6443 and afterwards it will forward the request to the backend connection which are master-1, master-2, and master-3 ( kubernetes cluster ) using round robin scheduling algorithm. Therefore we are able to connect to the cluster with 1 fault-tolerance (I found good article that discusses about fault-tolerance in kubernetes here).
- Keepalived will be responsible to listen the “heartbeat” to each HAproxy instances by using a script called
check_apiserver.shas it’s mentioned in/etc/keepalived/keepalived.confonvrrp_script check_apiserver {}section , here what it looks like :
#!/bin/sh

errorExit() {
  echo "*** " 1>&2
  exit 1
}

curl --silent --max-time 2 --insecure https://localhost:6443/ -o /dev/null || errorExit "Error GET https://localhost:6443/"
if ip addr | grep -q 192.168.1.110; then
  curl --silent --max-time 2 --insecure https://192.168.1.110:6443/ -o /dev/null || errorExit "Error GET https://192.168.1.110:6443/"
fi
Keepalived refers to this healthcheck script to check continuously the response of HAproxy master while it’s running (the current instance) and whenever it losts the connection, then Keepalived would evaluate by giving it some time to make sure whether the current designated instance is healthy or run into failure. If there is no any response until the time is up, Keepalived is going to switch the virtual IP to the backup one. Let’s look back to Keepalived configuration on vrrp_script check_apiserver {} section !
  1. script "/etc/keepalived/check_apiserver.sh" ---> healtcheck script file
  2. interval 3 ---> will run healthcheck script every 3 seconds
  3. timeout 10 ---> if it waits longer than 10 seconds, it assumes that particular healthcheck run has failed
  4. fall 5 ---> it has to fail 5 times consecutively in order to assume that node is actually failed
  5. rise 2 ---> it has to suceed 2 times consecutive in order to assume that node is back online again
  6. weight -2 ---> when it fails consecutively for n-times of fall ( which is in this case is 5 ), it's going to reduce the priority of LB node by 2. In the future, when the instance restart, Keepalived will specify which one is master and backup by refering to the priority number. The highest priority number will be elected as master. But in this time, I just want to make it simple by giving the two instances 100 as priority number.
- Start HAproxy and Keepalived on both instances
systemctl enable --now keepalived && systemctl enable --now haproxy
If there’s no any failure, it means HAproxy and keepalived has been ready to be used. But we still some works to do now, so let’s get all the things done. Now we are going to setup kubernetes using kubespray.
- Prepare the inventory in
inventory.inifile
[all]

[kube_control_plane]

master-1.lab-home.com
master-2.lab-home.com
master-3.lab-home.com

[etcd]

master-1.lab-home.com
master-2.lab-home.com
master-3.lab-home.com

[kube_node]

master-1.lab-home.com
master-2.lab-home.com
master-3.lab-home.com
worker-1.lab-home.com
worker-1.lab-home.com

[calico_rr]

[k8s_cluster:children]
kube_control_plane
kube_node
calico_rr</pre>
- Fulfill the hosts in
hosts.yamlfile. Make sure all of the machines get recorded in that file with the proper nodes name and IP Address
all:
  hosts:
    master-1.lab-home.com:
      ansible_host: 192.168.1.101
      ip: 192.168.1.101
      access_ip: 192.168.1.101
    master-2.lab-home.com:
      ansible_host: 192.168.1.103
      ip: 192.168.1.103
      access_ip: 192.168.1.103
    master-3.lab-home.com:
      ansible_host: 192.168.1.105
      ip: 192.168.1.105
      access_ip: 192.168.1.105
    worker-1.lab-home.com:
      ansible_host: 192.168.1.115
      ip: 192.168.1.115
      access_ip: 192.168.1.115
    worker-2.lab-home.com:
      ansible_host: 192.168.1.124
      ip: 192.168.1.124
      access_ip: 192.168.1.124
  children:
    kube_control_plane:
      hosts:
        master-1.lab-home.com:
        master-2.lab-home.com:
        master-3.lab-home.com:
    kube_node:
      hosts:
        master-1.lab-home.com:
        master-2.lab-home.com:
        master-3.lab-home.com:
        worker-1.lab-home.com:
        worker-2.lab-home.com:
    etcd:
      hosts:
        master-1.lab-home.com:
        master-2.lab-home.com:
        master-3.lab-home.com:
    k8s_cluster:
      children:
        kube_control_plane:
        kube_node:
    calico_rr:
      hosts: {}
- Activate DNS mode to be manual in
k8s-cluster.yml( full path ->inventory/${inventory_name}/group_vars/k8s_cluster/k8s-cluster.yml)
dns_mode: manual
# Set manual server if using a custom cluster DNS server
manual_dns_server: 192.168.1.176 #specify and replace your DNS here
- Activate External Load Balancer in all.yml ( full path –> inventory/${inventory_name}/group_vars/all/all.yml )
## External LB example config
apiserver_loadbalancer_domain_name: "lb.lab-home.com" #specify and replace your LB FQDN here
loadbalancer_apiserver:
   address: 192.168.1.110 #specify and replace your LB here
   port: 6443</pre>
- it’s ready to launch. Here we go!!
ansible-playbook -i inventory/mycluster/hosts.yaml --become --user root cluster.yml
It probably will be a lengthy process, so take a cup of coffee and wait a while until the cluster is ready 😄
Wa i t i n g . . . . .

- Once the installation process has done, don’t forget to copy
admin.conffrom one of the master nodes to our host
scp root@master-1:/etc/kubernetes/admin.conf /home/oji/.kube/config
then replace 127.0.0.1 which is localhost IP Address to virtual IP that have been prepared ( 192.168.1.110 )
sed -i "s/127.0.0.1/192.168.1.110/g" /home/oji/.kube/config
Make sure the ownership and permissions is already set properly. So what are we waiting for ? let’s check it out !
oji@LAPTOP-AGEMNL1C:~$ kubectl get nodes
NAME                    STATUS   ROLES                  AGE     VERSION
master-1.lab-home.com   Ready    control-plane,master   6d18h   v1.22.2
master-2.lab-home.com   Ready    control-plane,master   6d18h   v1.22.2
master-3.lab-home.com   Ready    control-plane,master   6d18h   v1.22.2
worker-1.lab-home.com   Ready    worker                 6d18h   v1.22.2
worker-2.lab-home.com   Ready    worker                 6d18h   v1.22.2
- High Availability Testing
Here is the current condition of HAproxy 1 & 2 consecutively :


As we can see the pictures above, virtual IP belongs to lb-1.lab-home.com or HAproxy 1. Now what to do in order to test the Availability between HAproxy instance is reboot HAproxy 1 instance to assume it runs into machine failure and it might be caused by power outage or whatsoever.


After that, we’ll see that virtual IP Address has been moved eventually to lb-2.lab-home.com or HAproxy 2. It means we’re still be able to access the cluster even though there is a down time for a split second.
But it doesn’t stop on this step, we still have one more case if HAproxy service in lb-2.lab-home.com is no longer available to receive the request. So just stop HAproxy service on lb-2.lab-home.com and wait until the virtual IP has been switched to HAproxy 1 again.

Yeahhh finally

I hope it might be useful! See you later!